AT Mouse Help
Conventions
Below we will use these abbrevations:
- NumINS = The key Insert/0 on the Numeric keypad
- INS = The key Insert (either standard OR numeric)
- AT Mouse menu = The menu displayed when pressing NumINS + LeftMenu (see below)
- DoublePress = Press a key twice rapidly
- FastPress = Key down very short time after the release of the same key
- Arrow Key = Used for both keys that moves the mouse pointer as well as for inline navigation. When used with Mouse Keys, the W-A-S-D and center numpad key ("5") is included in the term. (See below)
- Extened keys (Navigation keys) = The portion of a standard keyboard to the left of the Numeric Keyboard (Numpad)
- Alphanumeric Keyboard = The leftmost portion of a standard keyboard with the QWERTY keys
- CC = Context Click (See below)
AT Mouse help
To access AT Mouse help, documentation and other online resources and information, this is the shortcuts:
- AT Mouse help
On Internet: INS + (F1 OR H | F2 for offline help)
or
http://www.activetemplates.com/pages/at/atmouse/help/
- AT Mouse About dialog: INS + A
System Tray Icon and the AT Mouse menu
In the System Tray in the Notification Area to the right on the Windows Taskbar, you will find AT Mouse represented
as an icon:  .
.
If you don't find this icon, AT Mouse might not be running, or you may need to expand the Notification Area to show hidden icons.
(Note: In some cases on Windows 7 it is observed for this and other applications that the icon occationally turns blank, but still respond to user interaction.)
Clicking on this icon with the right mouse button (or pressing NumINS + LeftAlt OR Alt + INS) will display a menu located at the position of the mouse pointer.
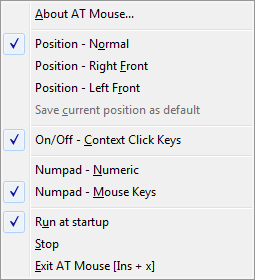
A Double Click on this icon with the left mouse button (or pressing NumINS + A) will display an AT Mouse "About" window with access to e.g. support information.
At the bottom of the AT Mouse menu you will find an option to load AT Mouse automatically at startup.
This will automatically start AT Mouse after the user logs on to Microsoft Windows.
AT Mouse will not be available during or before logon.
The command "Stop (resume)" will suspend most of the AT Mouse key mappings.
The command "Exit AT Mouse" will quit and unload AT Mouse.
The shortcut is: INS + x (Note that INS need to be kept down while "x" is released as the exit command is activated on the release.)
Alternative shortcut for exit is: Alt + Shift + ScrollLock
To Restart the command is: INS + (Shift OR Control) + x.
Mouse orientation
On the AT Mouse menu you will find 2 mouse orientation (position) choices in addition to the normal orientation.
This do not affect the Mouse Keys feature described below.
For ergonomic reasons many are adviced to position their traditional mouse device in front of the keyboard and to shift arms and positions.
Users are used to see the mouse pointer moving up north on the screen when moving the mouse towards the monitor.
This will not be the case when positioning the mouse in front of the keyboard, using the left or the right hand.
To compensate for this and avoid the confusion when shifting positions, the position choices on the menu can be used to make
the mouse pointer still move up north when moving the mouse towards the screen.
Mouse Keys
The motivation for the Mouse Keys feature is to improve ergonomics by facilitating the keys on the keyboard to move the mouse pointer, clicking and scrolling.
AT Mouse Mouse Keys will reduce the need for leaving the keyboard with the mind and the fingers as the main input device and hence encourage the use of keyboard instead of mouse for many commands.
AT Mouse Mouse Keys will facilitate a keyboard based approach when appropriate shortcuts dont't exist, not known by the user.
Very often Mouse Keys simply is the most efficient way.
Many will find it useful to combine traditional mouse with the Mouse Keys side by side, while others will find the Mouse Keys so useful and convenient that they
literally forget to use their usual mouse device.
Besides moving the mouse pointer and click, Mouse Keys support functions like e.g. drag and drop and scrolling.
Mouse Keys may be used with laptop keyboard as well as a standard keyboard. A standard keyboard with numpad is recommended.
To facilitate the functionality, AT Mouse has remapped(captured) the standard meaning of certain keys on the keyboard. Some are captured entirely and some are captured in certain combinations.
If the user temporarily should need the original key mappings, the user can with the menu AT Mouse choose one of 3 options:
- Select Numpad Numeric if that is what is needed.
- or - Select Stop to suspend most of the AT Mouse key mappings
- or - Select Exit to quit the AT Mouse application
Left click
- CapsLock
- Numeric Enter (If numpad is set up to be used as mouse keys)
Right click
- LeftAlt + CapsLock
- Pause
- Numeric Delete/comma (If numpad is set up to be used as mouse keys)
Scrolling
- ScrollLock (Down) and Shift + ScrollLock (Up)
- Numeric �+� (Down) and Numeric �-� (Up) (If numpad is set to be used as mouse keys)
Guidelines
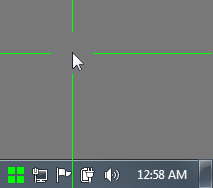 Mouse Keys use guidelines in the form of a horizontal and vertical axis.
Guidelines makes it much more efficient to take the mouse pointer "from A to B", reducing the moves and keystrokes needed.
The guidelines are green with standard operation. When guidelines are visible at the same time as right or left
"mouse key - click" is pressed, the guidelines turns yellow.
When not mouse-lock is activated and guidelines are visible and a right or left -click key is released, the guidelines disappear at once instead of the usual few seconds delay. (See "Moving mouse pointer" below.)
Guidelines can be very useful also for visually aligning elements on the screen on both axis.
With Mouse Keys Lock activated, you will see the guidelines following the mouse pointer when it is moved around with a standard Mouse device.
Mouse Keys Lock
Mouse Keys Lock keeps the green vertical and horizontal mouse pointer position axis on the screen visible.
Mouse Keys Lock is activated by pressing
- Insert (Not on the numeric)
- RightControl + Num Insert/0
Mouse Keys Lock is temporary activated by pressing and keeping down:
- RightWindowsKey
- RightAlt(Or AltGr) + RightControl
With Mouse Keys Lock activated, you may use these keys for moving the mouse pointer:
- Standard arrow keys (not numeric)
- W-A-S-D
- Numeric keyboard (see below)
Numpad: Toggle between Numeric and Mouse Keys input
Default input mode for Numpad is Mouse Keys.
Press NumLock + (Tab OR Numeric "/") to toggle between current and last numpad input mode.
To enable numeric input you may do one of the following:
- Press the LeftControl key twice rapidly ("DoublePress") and keep the LeftControl key down on the second press. (You will notice the Numlock lamp is turned on if the key and speed is correct.) While the LeftControl is kept down, the numpad is in numeric input mode.
- Press NumLock + Enter
- Press NumLock + N
- Select "Numpad - Numeric" on the AT Mouse menu
(When in Numpad Numeric mode, "Numeric" in blue letters are displayed in a corner of the screen, except when using the LeftControl DoublePress option)
To enable Mouse Keys input you may do one of the following:
- Press NumLock + Numeric "+"
- Press NumLock + M
- Select "Numpad - Mouse Keys" on the AT Mouse menu
Moving mouse pointer
If numpad is in Mouse Keys mode, the arrows on the numpad is used for navigation.
Both the center key "5" and the Down arrow key "2" will work as arrow down.
If not Mouse Lock is active, the green guidelines will appear when a mouse pointer move is initiated with the arrow keys, and disappear a few seconds
after last mouse move is finished.
By keeping 2 adjacant arrow directions pressed at the same time, the mouse pointer is moving in an angle between the 2 arrow directions.
When releasing either of the 2 arrows, the move will continue in the direction of the remaining arrow key.
Shifting the mouse pointer speed is done the same way when combining 2 arrow keys. However, using Modifiers over DoublePress (see below) is recommended in this case.
Edge crossing
When moving the mouse pointer towards the edge, another move in the direction against the edge will make the mouse pointer jump to
the opposite side of the screen and continue in the same direction. This is a shortcut to get to the other side of the screen, and is useful when combining multiple monitors.
Mouse pointer speed
There are 3 speed variations:
- Slow - for precision
(When the mouse pointer is in slow speed mode, a small portion of the guideline on all directions close to the mouse pointer turns black.)
- Medium (Default) - for short distance move
- Fast - for longer distance move
There are 2 main ways of altering the speed of the mouse pointer move:
Double Press
When initiating a mouse move with an Arrow Key by a DoublePress, the speed shifts to Fast.
However, if the second press occurs after a time treshold of about one second, the second press will shift speed to Slow.
This is visually illustrated in that a small black portion (about 10 pixels of the guideline about 100 pixels from the mouse pointer)
on the axis in the direction of the move is turning red after the mentioned amount of time.
When FastPress and DoublePress is registered, an audible sound (like a "click") can be heard.
When a FastPress(Key down very short time after the release of the same key) occur speed shifts in this order:
- Medium to Slow (To Fast when pressed before ca one second when initating a move)
- Slow to Fast
- Fast to Medium
- Medium to Slow
To assist in the decision on when to slow down in order to hit a rather small target, a portion of the guideline is colored red in the direction of the move.
When moving Fast this portion is about 50 pixels long at an appropriate distance from the mouse pointer.
When moving Slow, the portion is about 10 pixels and located about 100 pixels from the pointer.
Using these red helplines, it is recommende to keep the eyes on the target and slow down when these clues reach the target.
(When moving in an angle combining 2 directions, these visual clues are not relevant or visible.)
Modifiers
When Mouse pointer is not moving and INS is pressed, the mouse pointer will start at Slow speed when a move is initiated.
The modifiers below are assuming mouse pointer is already moving.
The keys below are the speed modifier keys.
What keys to use depends on if you use Numeric Mouse Keys or not, and if you like to use one or 2 hands on the task.
Double Action keys - Modifies speed on the way both down and up
- INS (Numeric INS and Extended INS) OR Space OR Numeric "+"
Pressing or release key while current speed is...
- ...Medium when last speed is None or Slow, will shift speed to Fast
- ...Fast, will shift to Medium
- ...Medium when last speed is Fast, will shift to Slow (with retardation when using INS)
- ...Slow, will shift to Fast
Functionality exception regarding INS:
When combining 2 of the arrow keys left OR right with the numeric center "5" to make a downwards angle move, the INS key do not have any effect.
This apply for most keybards, except many high quality keyboards that don't have this design limitation.
Similar apply for the combination: Mouse Lock turned ON + Arrow Down combined with Arrow Right on the Extended (navigation) part of the keyboard.
- Numeric Enter
Pressing key while current speed is...
- ...Fast, will shift to Medium
- ...Medium, will shift to Slow
Single Action keys - Modifies speed on the way down only and slows down one speed step at a time
- RightControl - Slows down immediatly to next speed step level
- Esc - Slows down with retardation
Mouse Grid
Screen grid
The AT Mouse Mouse Grid implementation works seamless with moving the mouse pointer using arrow keys.
Mouse Grid is activated by pressing the numeric corner keys 7(Home), 1(End), 9(PgUp), 3(PgDn).
When activating the Mouse Grid by pressing 7(Home) the mouse pointer moves to the center of a square defined by your current mouse pointer position and the upper left corner of the screen.
(When keeping a Ctrl key down while pressing the Mouse Grid key, Mouse Grid assumes you start from a mouse pointer position in the center of the screen.)
On key down a red guideline cross is displayed on the active Mouse Grid area as described.
To move the mouse pointer to the center of the bottom left corner of the square described, press the key 1(Home).
Continue this way until the mouse pointer is located above your target. When the square is very small, the visual red guidelines will disappear.
When you have reached the maximum number of moves to narrow down, a "click sound" can be heard. The subsequent Mouse Grid move will then start over again dividing the screen.
Adjustment grid
The small adjustment grid applies:
- after a Mouse Keys arrow move using the numeric arrow keys
- Mouse Keys Lock is turned off
- guidelines are still visible after the move
Pressing the corner keys in the context as described above will start narrowing down using a red small square for quick final adjustments.
Pressing the Numeric INS key instead of a corner key will display a 4 times wider red small grid with the current mouse pointer position as the center.
Cancel the grid
The red guidelines will disappear after a few seconds (if not Mouse Keys Lock is activated) when you do a Mouse Keys left or right mouse click, or if you initiate a Mouse Keys arrow move.
Pressing Numeric INS while the red grid is visible will remove the red grid. This applies also if Mouse Keys Lock is turned on.
Context Click
Context Click lets you predefine locations on the active window to acces with a single keystroke. These spots are marked with a small green or black square, containg a number.
Make sure that Context Click is checked on the AT Mouse menu.
Use these key combinations for the following actions:
- INS + Left Click
Create a Context Click spot on current active window
- LeftControl + INS + Left Click
Delete all Context Click spots for current active window
- INS + a number key on the alphanumeric keyboard
Move mouse pointer to the Context Click spot. Repeating this combination will perform a LeftClick on the CC spot.
- Shift + INS
Access Context Click spots with a number key only. Display spots with green text on black backround
Volume Control
These keys control the speakers Master Volume:
Right Windows Key or Right Alt(gr) + Right Control
- "<" or ","=Volume Down
- ">" or "."=Volume Up